Have you ever wondered if your computer could detect your emotions through your webcam — just like in sci-fi movies? Well, in this project, you’ll learn how to build a Real-Time Emotion Detector using Python, OpenCV, and a pretrained deep learning model, all running locally on your system!
This blog is especially made for beginners. No deployment or hosting — just run it on your laptop using VS Code.
Before that Checkout Git Repo :- GitRepoLink
Checkout Linkedin Post :- Post Link
📂 What You’ll Learn
- Face detection using Haarcascade in OpenCV
- Emotion prediction using a pretrained Mini-XCEPTION model
- Real-time webcam feed and UI display with emotion percentage bars
🛠 Prerequisites
Before we begin, make sure you have the following:
- Python installed (recommended: Python 3.10)
- Visual Studio Code (VS Code)
- A working webcam
- Basic Python knowledge
- Internet (only once, to install dependencies)
🧠 Folder Structure
Here’s how your project folder should look:
Emotion_Detector_ML/
│
├── venv/                      # Virtual environment
├── _mini_XCEPTION.102-0.66.hdf5   # Pretrained model
├── emotion_detector.py        # Main Python script
├── requirements.txt           # Dependency list
🪜 Step-by-Step Guide
✅ Step 1: Set Up the Project Folder
- Create a new folder called
Emotion_Detector_ML. - Inside it, create a file named
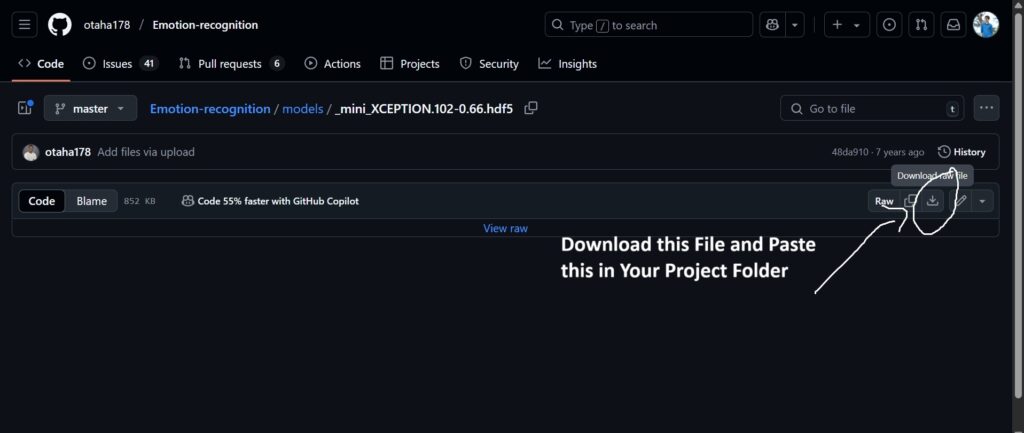
emotion_detector.py. - Add the pretrained model
_mini_XCEPTION.102-0.66.hdf5to the same folder. You can download it from this source.
✅ Step 2: Create and Activate Virtual Environment
Open terminal in VS Code:
python -m venv venv
Activate it:
- For Windows:
venv\Scripts\activate
- For Mac/Linux:
venv/bin/activate
✅ Step 3: Install Required Libraries
Run this command in the terminal:
pip install opencv-python tensorflow keras numpy
📚 Why These Libraries?
| Library | Why it’s used |
|---|---|
opencv-python | To access the webcam, capture frames, and detect faces. |
tensorflow | Base library needed for deep learning operations. |
keras | To load and use the pre-trained Mini-XCEPTION model. |
numpy | For mathematical operations and image array manipulation. |
✅ Step 4: Add the Python Code
Copy and paste this into your emotion_detector.py:
from keras.models import load_model
import cv2
import numpy as np

# Load model
model = load_model("_mini_XCEPTION.102-0.66.hdf5", compile=False)
emotion_labels = ['Angry', 'Disgust', 'Fear', 'Happy', 'Sad', 'Surprise', 'Neutral']
colors = [(255,0,0), (0,255,0), (0,0,255), (0,255,255), (255,0,255), (255,255,0), (100,100,100)]

# Load Haar cascade
face_classifier = cv2.CascadeClassifier(cv2.data.haarcascades + 'haarcascade_frontalface_default.xml')

cap = cv2.VideoCapture(0)

while True:
    _, frame = cap.read()
    gray = cv2.cvtColor(frame, cv2.COLOR_BGR2GRAY)
    faces = face_classifier.detectMultiScale(gray, 1.3, 5)

    canvas = np.zeros((250, 300, 3), dtype="uint8")  # for percentage bar UI

    for (x, y, w, h) in faces:
        roi_gray = gray[y:y+h, x:x+w]
        roi_gray = cv2.resize(roi_gray, (64, 64), interpolation=cv2.INTER_AREA)

        if np.sum([roi_gray]) != 0:
            roi = roi_gray.astype('float')/255.0
            roi = np.expand_dims(roi, axis=0)
            roi = np.expand_dims(roi, axis=-1)

            prediction = model.predict(roi)[0]
            emotion_idx = np.argmax(prediction)
            label = emotion_labels[emotion_idx]

            # Draw face box & label
            cv2.rectangle(frame, (x,y), (x+w, y+h), (0,255,0), 2)
            cv2.putText(frame, label, (x, y-10), cv2.FONT_HERSHEY_SIMPLEX, 1, (0,255,0), 2)

            # Draw bar graph
            for i, (emotion, prob) in enumerate(zip(emotion_labels, prediction)):
                bar_x = 10
                bar_y = 20 + i*30
                bar_width = int(prob * 200)

                cv2.rectangle(canvas, (bar_x, bar_y), (bar_x + bar_width, bar_y + 20), colors[i], -1)
                cv2.putText(canvas, f'{emotion} {int(prob*100)}%', (bar_x + 5, bar_y + 15),
                            cv2.FONT_HERSHEY_SIMPLEX, 0.5, (255,255,255), 1)

    # Combine main frame and canvas
    frame_resized = cv2.resize(frame, (600, 400))
    canvas_resized = cv2.resize(canvas, (300, 400))
    combined = np.hstack((frame_resized, canvas_resized))

    cv2.imshow('Emotion Detector with UI', combined)

    if cv2.waitKey(1) & 0xFF == ord('q'):
        break

cap.release()
cv2.destroyAllWindows()
✅ Step 5: Run the Project
In terminal (make sure virtual environment is active):
python emotion_detector.py
🟢 Once the webcam opens, it will:
- Detect your face in real time
- Predict the emotion
- Show a label + percentage bar for all emotions
Press Q to quit.
🔚 What’s Next?
That’s it! You’ve just built a real-time emotion detector completely on your own, using your webcam and Python.
This project is a great way to understand how computer vision and deep learning work together. Try customizing the interface or even training your own model in the future!
Happy Coding! 🚀
If you tried this project, do share it on Instagram and tag @udaycodes — I’d love to see what you build! 💻📷